Wednesday, June 1, 2022

The Five Stages of Sailmaking

 (My apologies to Elizabeth Kubler Ross, whose five stages of grief are: Denial, Anger, Bargaining, Depression, Acceptance. It was noted in her study that people, when faced with any traumatic life event will pass through these stages, in a certain order, although the person may jump ahead and then repeat these stages. Sailmaking is no exception.)


DENIAL

Even after many discussions and cost comparisons of making vs buying a ready made sail, when it was determined that making a sail would save us nearly $1000, I pretty much blocked the decision from my mind.

The kit came in this unassuming box, was placed in the basement and promptly ignored. 

For at least a month.

Maybe longer...

this box sat unopened for about a month


ACCEPTANCE

When at last it was noted that sailing season was less than a month away, we opened the box, sorted out the supplies, and set up the workspace.

Note the smile. This is what psychotic looks like.


This is the enormous spool of thread. It had to be threaded around the leg of the table as the actual machine spindle is entirely too small. 
This should be a warning. 

Note the two shades of fabric. This is an example of the layering technique used to make the sail.
The sections are numbered 1-8. This is section 8 attached to section 7. Moving from smallest to largest. Except that there is a need to skip sections and attaching 'relatively smaller to relatively larger' until all you have left is two ridiculously large sections that in NO WAY are easy to manage. The sections are sewn one on top of the other rather than along a layered seam line. It would be impossible to open and crease a traditional seam. These seams are sewn with two lines of zig-zag stitches. This not only locks the fabric twice, sort of hems the dacron and most importantly looks Super Cool 

Once the sections get too large to handle flat - which would be about one double section - the excess fabric is rolled and secured in any manner you can think of, including but not limited to double sided seam tape, masking tape, rubber bands, chip clips, paperclips and heavy duty clamps. 


Be warned - none of these methods will stay secure and will release at the most crucial moment of sewing thus causing the excess weight of the fabric to unfurl and pull from under the machine needle leading to missed stitches, broken needles and Stage Three

ANGER
At this stage you must resign yourself to the fact that two people are not going to manage this task and if you want to save the marriage you will call someone unrelated to act as mediator and fabric wrangler. In this case it was our friend The Fireman. (Our son had assisted on some of the smaller portions but for some reason became 'unavailable' by phone, text. email and search warrant.)


 The Fireman has entered into the ACCEPTANCE phase. 
Where as I am hovering between the stages of Divorce and Justifiable Homicide. 

However, the fewer giant pieces of dacron left lying on the furniture and floor of the basement gradually placed me into 
BARGAINING
I have ceased any inner dialogue. I am openly praying to any and every deity available to PLEASE PLEASE PLEASE don't break another needle and make me resew the last three feet again....


Apparently my prayers were answered as when what I thought was my last needle snapped into fourteen tiny shrapnels, I found an entire new pack of heavy duty needles in my supply dish. 

Once the sail is completely pieced together the sides must be finished which involves encasing the raw edge in double fold fabric. This went much easier that any of us expected. 
The final sewing machine task is making the channel for the bolt rope. The bolt rope stiffens the leading edge of the sail and allows a more firm edge to the hanks which will attach to the forestay. 
(In layman's terms - this hooks the front sail to that front line as noted in every cartoon drawing of a sailboat.)


Now we enter into possibly the saddest moment of this sailmaking process. Or the most optimistic depending on your mindset. Note that tiny string extending from the bottom of the sail? This is the waxed cord that is enclosed in the rope channel. Ideally it does not get sewn down or stuck to the seam tape because it is going to be attached to the bolt rope itself and then very carefully pulled through the channel by the guy in the garage as The Fireman and I quietly pray and take bets on just when and where the cord is going to either get stuck or break. 


a close up of the cord and the attached rope

Which now leads us to the final official stage of Kubler-Ross's stages
DEPRESSION

Because, if you hadn't figured it out yet, the cord broke exactly ONE FOOT from the opposite end. There may have been some light cursing and an exchange of money. 
We had a cheese and cracker break and after a group vote it was decided to make a small incision into the channel itself, reattach the cord and work that %$#$%$ rope through to the end. 

Thus ending the Five Stages.
I would like to amend these stages with one final stage

DEVIOUS JOY!!

I have now come to the realization that I NO LONGER have to sew anything on the machine! 
HA! 
There are just bags of hardware left on the supply table and this is NOT my job.

Except that I have just been informed that the metal rings have been attached to the top and bottom of the bolt rope and now I have to HAND SEW them securely. 

Commencing re-entry into 
ANGER
DENIAL
BARGAINING
DEPRESSION
ACCEPTANC


This will make it all worthwhile, once that sail is complete....

At this writing I have successfully ignored my hand sewing duties for a week. The picture above is of St. Frank with the too small jib sail from our much smaller wooden boat. Thankfully, although sadly, the month of May has not cooperated weather-wise or life schedule-wise to allow us to get to the boat. 
I have managed to get the cushion covers washed up, purchased some surprisingly cheap non-breakable dishware, and planned the cabin curtains. Although the fabric for same is still lying downstairs waiting to be cut. Oh, and the bimini still needs to be measured for fabric purchase and creation. 
But that will be another, less hateful post.
I hope....


Wednesday, April 6, 2022

Welcome to the Coast


Hello!

It’s been a while, hasn’t it…something like two years and a month….

Things have changed, haven’t they? We have all been through some stuff…

I have tried, on more than one occasion to get a post up, but they all just seemed so…depressing.

But, time passes and hopefully we have learned a few things to better prepare us... 

Prepare us for things like, oh, I don’t know…making a new sail…??? 

2019 saw our old sailboat die a sudden death by broken mast, aided by 40 years of poor upkeep compounded by rotting would and some really good wind. We were rail in the water when we heard the CRACK. Initially assuming it was all our stuff flying to the leeward side.  Instead, that horrible sound turned out to be one of the mast stays, which had pulled free of the interior anchor thus leaving the mast partially unsupported. I dropped the mainsail as Rob started the engine and we cautiously motored back to dock at 5mph. All the time discussing how we were going to fix the problem. Once docked, it become clear that the best way to fix the problem, short of sinking the boat in a hidden cove, was to somehow donate the boat.


this is not a good thing

 As luck would have it, the marina Cool Change lived at was run by a sailboat lover and they worked out a deal to just take the boat, and it’s brand new outboard, off our hands.

We decided then that our little 15ft wooden boat would do from here on out.

We decided that we would not buy another boat.

So, two years later, we bought a BIGGER boat….

Meet St. Frank, a 27ft, 35ish year old Catalina tall-rig. (this last descriptor becomes way more important than I thought it would…)


St Frank – formerly/currently/actually – named St Frances by her previous owner, will be eventually undergoing a name change. (Can a boat be gender fluid?) Not that we have anything against St. Frances – I have known two very lovely women named Fran. But St Frances is just not a name that fits us. Once we land on a name fitting to all three of us – Rob, me and the boat – there will be a renaming ceremony. I can’t risk angering Neptune any more than I already have.

St Frank has it all, her previous owner outfitting the cozy sloop with a microwave, a portable electric refrigerator, a sound system and an AIR CONDITIONER!! We have seat cushions, kitchenware, movable cupholders and no jib. (The jib is the smaller, front sail on a sloop. It helps balance the larger main sail and just makes the whole boat so pretty.)


an actual galley

AND no more leaking port-a-potty!

What the boat does have is a storm sail, which is a much smaller front sail for inclement weather and a Genoa.

the large sail at the bow is the Genoa, note how much small the actual main sail is

 A Genoa is an ENOURMOUS front sail which grabs every ounce of wind there is allowing for some fast racing, if you are so inclined, and a lot of heeling. (Where the side of the boat leans into the water, which is fun, but the exact opposite of relaxing which is always my goal when on a boat.)

Which brings me to the theme of the next few posts (yes, there will be more!)

Because sails are expensive and we have already spent our Not Buying Another Boat budget on the above said boat, AND because I have made two other sails, it was decided that we would order one more sail kit from Sailrite.

The two previous sails were also Sailrite kits – precut sail pieces, hardware and some really helpful directions and diagrams. These sails were for our wooden boat. Because if Rob could make the entire boat of wood, just think how cool it would be if I made the sails…

Anyway, it was definitely a learning curve. But it has been 15 years since I made those sails and apparently 15 years is exactly how long it takes for me to forget what a semi-complicated and awkward process sail making is on a portable home sewing machine.

Sails these days are made of dacron – what can only be described as plastic paper fabric. It is stiff when new but over time softens to an almost leather feel. And it makes a cool popping sound as the needle pierces it.

The mast for this new/old boat is 30ish feet tall, which calls for a rather big sail. However, all I heard when discussing this project was ‘jib’ and ‘it’s a smaller sail than the main’.

I have no concept of size, or distance. All I knew was the last jib I made was not enormous.  

I am pretty sure my judgement was impaired by a tasty rum drink.

Turns out the small sail for a 27ft boat is quite a bit larger than the big sail for a 15ft boat.

Huh.

The sail comes precut in sections. The process involves sewing sections together and then sewing these sections to the other sections until you have an entire sail. The idea is to keep the sections a manageable size. Which in theory makes sense, if you have a football field size work room with a table of the same dimensions.

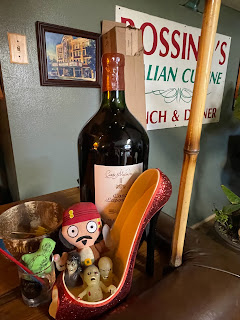
hardware with candles...

why a pic of an enormous bottle of wine?
 because this is what I will be drinking once this project is finished


I have two folding banquet tables, in a fully furnished basement family room that also currently houses a banana tree waiting for above 40 degree weather outside.

This is what that set-up looks like:
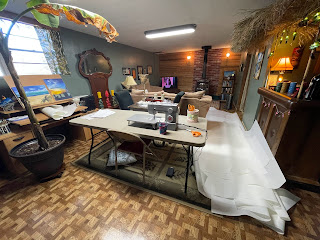
see all that white stuff on the floor? those are the PIECES of the sail

At this posting, the sail is about a third of the way finished.

Upcoming posts will discuss the finer points of securing, rolling and wrangling dacron, repetitive bobbin winding and needle threading and dealing with the panic of thinking you have sewn everything backwards……

Until next time...

this.
this is what makes all the broken needles worthwhile